Organizing and Safeguarding Information on Disk
Updated version of an article that originally appeared in ACM Ubiquity 4(6)
M. E. Kabay, PhD, CISSP-ISSMP, Associate Professor, Information Assurance
School of Business and Management
Norwich University, Northfield, VT 05663-1035 USA
mailto:mekabay@gmail.com
I have been asked by students and colleagues how I manage information that I use in writing articles and books. A recent question is, “I am … curious how you manage data you come across. I sense that when you are writing a paper or book and need to tap into some past work you or someone else has done, you have organized your hard drive in such away that you don't have to hunt to long to find it (maybe you use a database of some sort rather than a directory structure).”
This essay summarizes how I handle information on disk. I don’t claim that my methods are ideal or based in any particular theory; I just don’t like clutter, and I like to be able to find stuff when I need it. I also dislike having to redo my work, so I’ll also summarize how I have chosen to back up my data.
The figures in this document mostly show my main system in 2002, which used
Windows 98 Second Edition. In preparing an update with a few additional figures,
I took snapshots of menus from my current system which uses Windows XP Professional.
However, the guidelines can apply to any operating system with suitable adaptation.
I hope that you will find at least some of the suggestions useful. Just be
sure that you understand right from the start that my main point is that you
can benefit by figuring out a system that suits your needs – not that
my system should be adopted by everyone.
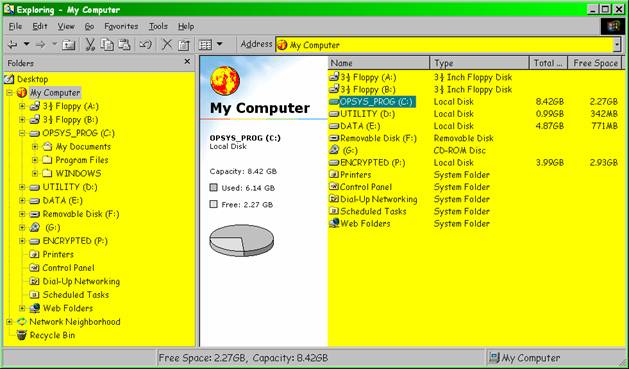
First of all, it’s useful to have multiple disk drives or to partition disk drives into virtual drives with different functions. For example, on my system, the drives are as shown in Figure 1 :
Figure 1 . Hard disks and partitions.
Keeping as much user data off the operating-system (OS) disk makes it easier to handle backup/restore operations. For example, the P: drive shown above is entirely encrypted (using PGP) and can be synchronized in a single operation between the main system and a portable system.
At one time, my D: & E: drives were actually on a separate physical drive from the C: drive. This arrangement reduced contention for the disk controller running the operating system drive; with all the activity – especially virtual memory swapping – on that drive, there was a performance gain in having separate read/write heads for the OS and user data.
The D: drive is for more static and less critical data that are convenient to keep around. Figure 2 shows how it’s where I put all my installation files for updates, various indexes and so on.
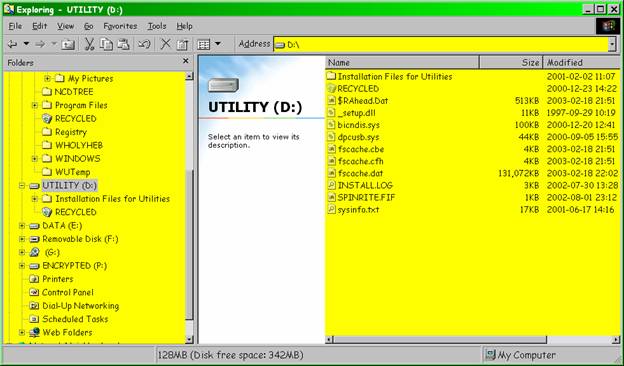
Figure 2 . Utility drive.
Notice that most of those files are normally hidden from view (the icons are shown grayed out).
The E: drive (“Data”) is the host drive for the encrypted partition P: and also serves as a workspace. Figure 3 shows the contents of that drive with hidden files visible.
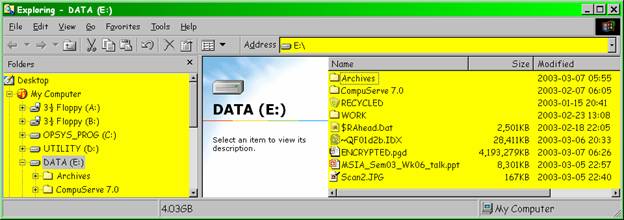
Figure 3 . Data drive.
The settings for displaying file information are shown in Figure 4 .
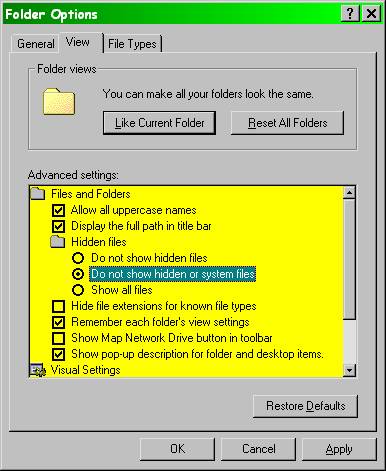
Figure 4 . File visibility options.
The most important option on this part of the panel is not to check “Hide file extensions for known file types.” People who don’t see the real file extensions can sometimes be fooled by malicious software files that misrepresent their actual file types; e.g., a Trojan horse file might be called something like “useful.txt.exe” and have a text-file icon associated with it. With suppression of file extensions enabled, the victim would see “useful.txt” with a text icon and might not realize that it was odd that that particular file should have a type-suffix visible when none of the other ones do. Opening the false text file would then run the harmful program.
All my active data are stored in an encrypted partition. The consequences of losing control over confidential data are far too great to risk having anyone get access to them; after all, I am supposed to be a security specialist. Can you imagine how embarrassing it would be to have my computer stolen (or have it in a repair shop) and discover data leakage of, say, client information? Dreadful thought.
As you can see from Figure 5 , the folder structure of my data is quite simple.
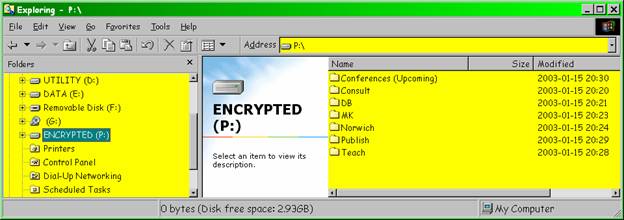
Figure 5 . Folders on the encrypted partition.
The folders are used for the following kinds of information as explained in the figure legends below (Figure 6 through Figure 12 ).
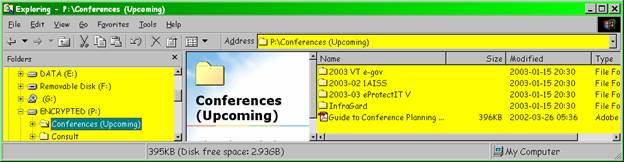
Figure 6 . Conferences (upcoming).
Tracking presentations for specific conferences or information used in organizing conferences.
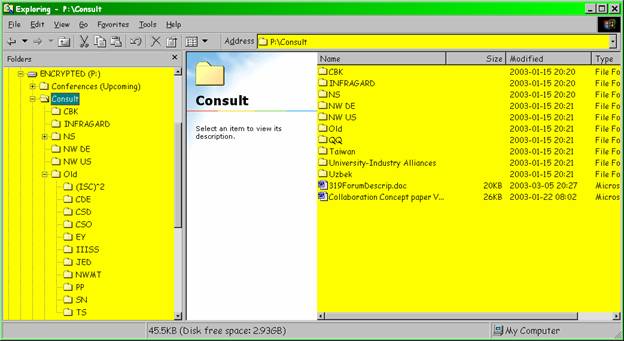
Figure 7 . Consult folder.
Information on specific consulting contracts. Folder names abbreviated to reduce problems of data leakage if someone sees the folder names (as in this paper).
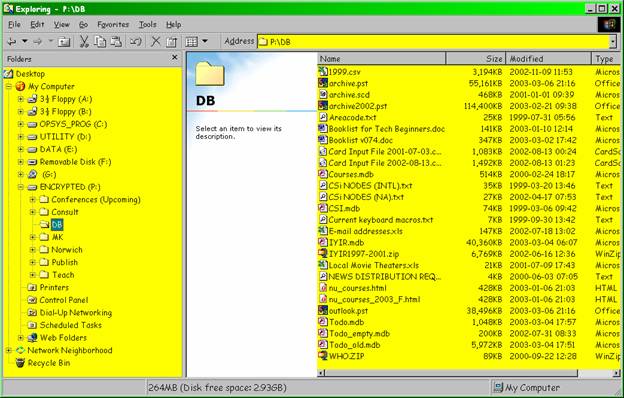
Figure 8 . DB folder.
Databases. Information used globally, including Information Security Year in Review, address books, e-mail files and so on.

Figure 9 . MK folder.
Personal files including hobbies and correspondence.
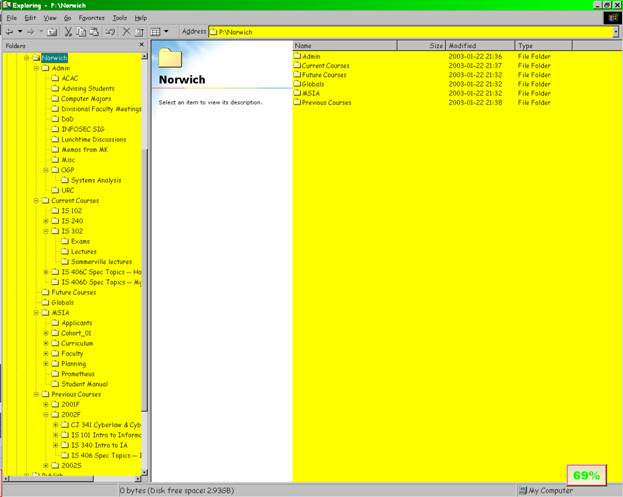
Figure 10 .
All the information relating to
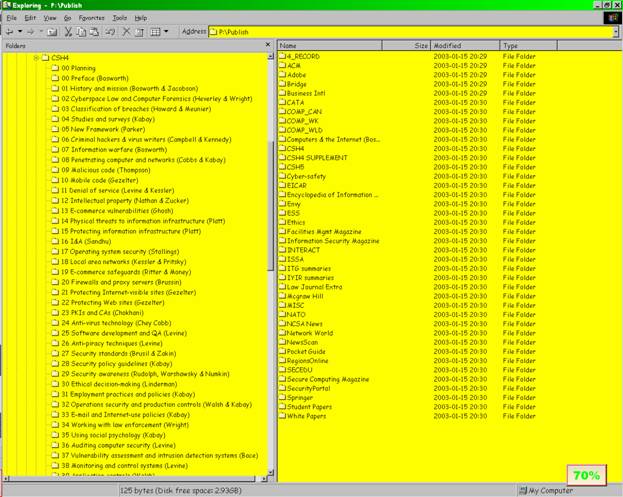
Figure 11 . Publish folder.
Everything written for publication. Each publication gets a folder. This screen shot shows the details for the Computer Security Handbook, 4th Edition, where every chapter got its own folder.
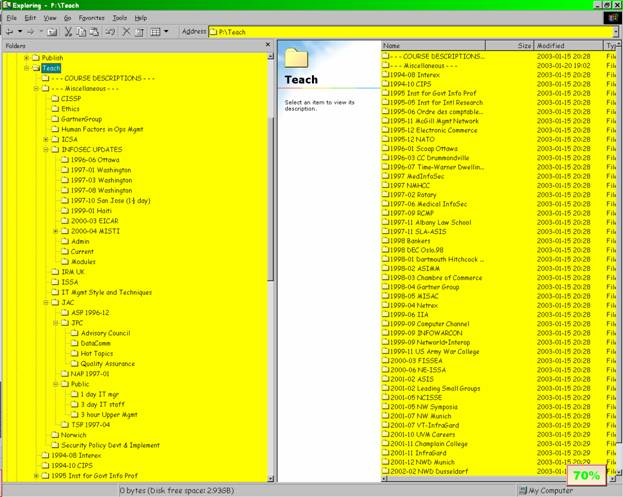
Figure 12 . Teach folder.
All the non-Norwich-University teaching materials I’ve developed over the years. This screen shot left panel explodes the Miscellaneous folder to show the substructure for courses that were repeated over the years. The rest of the folders (shown on the right panel) are for one-time events.
Non-confidential information about interesting topics (mostly information security) is stored in my Archives folder, shown in Figure 13 .
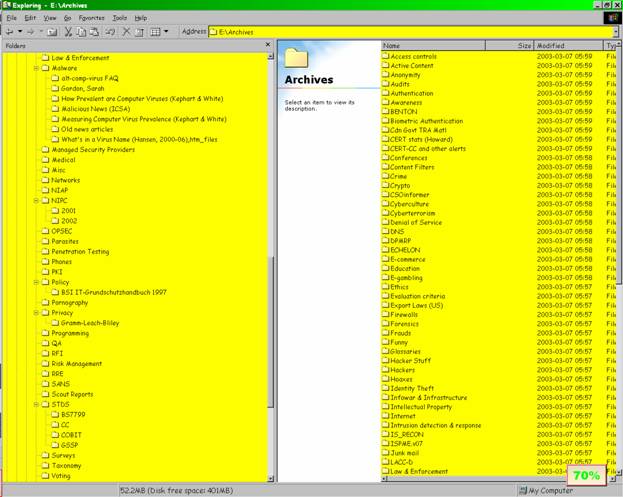
Figure 13 . Archive folder.
The right panel lists the folders from “Access controls” to “Law enforcement” and the rest are shown on the left-hand panel with some folders opened up to show substructure.
Because the World Wide Web is not a stable place, one can’t always count on finding neat stuff one has seen after a year has gone by. The archive is a useful way of keeping examples, case studies, or just plain interesting stuff available for thinking, writing and lecturing. Note the “Funny” folder which contains the most amusing tid-bits that people have sent me or which I have run across over the years.
The most obvious way to find files is to have good file names. Figure 14 uses the “Funny” folder to illustrate this principle.
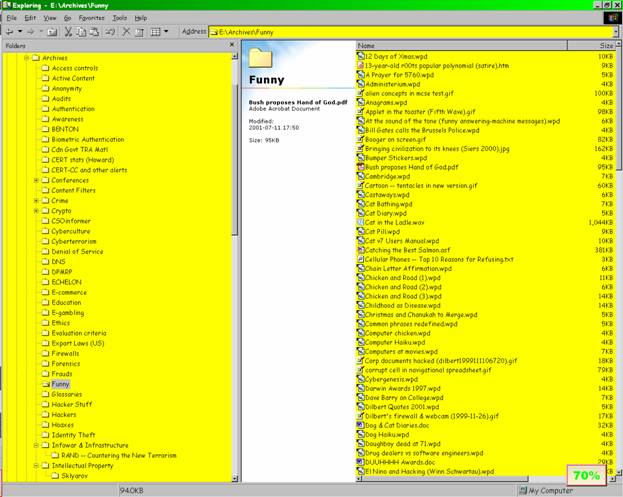
Figure 14 . File names in the “Funny” folder.
A quick note here about version numbers: I strongly recommend that you get into the habit of saving changes to important files (e.g., for me, my grade books for student results or manuscripts in progress) using version numbers. That way, if you accidentally damage information in a critical file, you may be able to find it in a previous version that you have backed up. If you always back up to the same file name, it’s harder to locate the undamaged information.
The next feature is one that too few people use: the properties sheet in MS-Office documents. Figure 15 illustrates this sheet for the document you are reading.
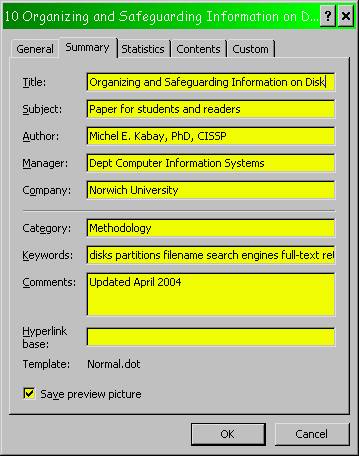
Figure 15 . MS-Word properties sheet.
A word of warning about the properties sheet: it can sometimes reveal more
information that you intended if you forget that it’s there. Many people in
business have forgotten that the properties sheet may contain confidential information
such as names of reviewers, specific keywords referring to internal project
names, telephone numbers, and even comments they would have preferred to keep
within the bounds of their organization. Check your properties sheet before
sending any document to a stranger or to someone outside your workgroup or organization
to be sure you approve of the information it is releasing to the world.
When you select a filename that includes a properties sheet, you can see those
properties in the Windows Web panel, as shown in Figure 16 .
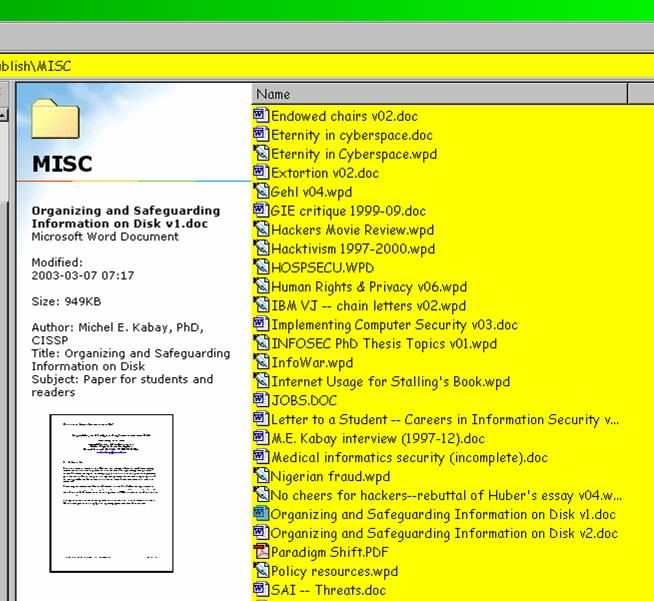
Figure 16 . Properties sheet information visible in Web panel.
In addition, the properties-sheet information can be used by search engines.
Microsoft’s “FindFast” feature allows rapid location of files including full-text searches, as does Corel’s QuickFinder program. Figure 17 shows the particular settings for the QuickFinder search function on my system.
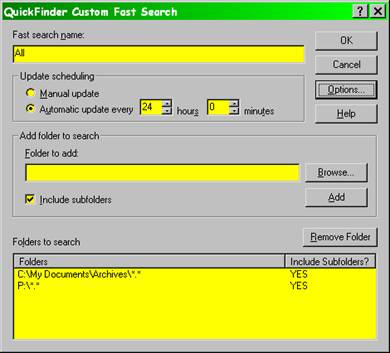
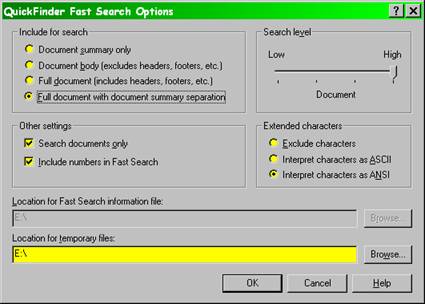
Figure 17 . Corel QuickFinder settings.
These search engines are helpful in locating specific files. For example, Figure 18 shows a search for the article you are reading. I entered the key words “disk,” “archives,” “partitions,” and “funny” to see which files contained all of them.
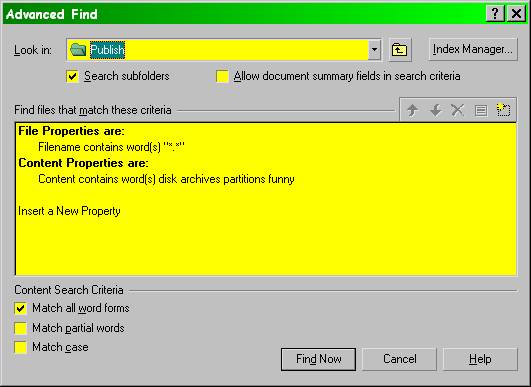
Figure 18 . Search settings in QuickFinder.
This search dutifully returned all occurrences of this article, as shown in Figure 19 .
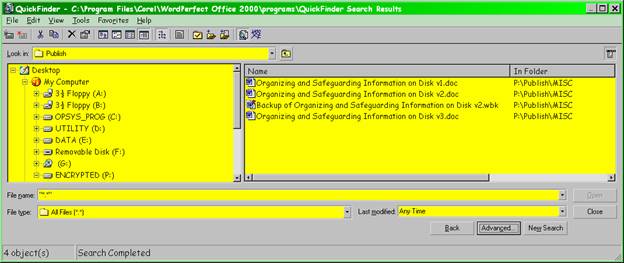
Figure 19 . Results of QuickFinder search.
Another search feature you can use if you have MS-Office is part of the FILE OPEN menu. As you can see below in Figure 20 , there’s a drop-down menu that opens a special search menu that is shown in
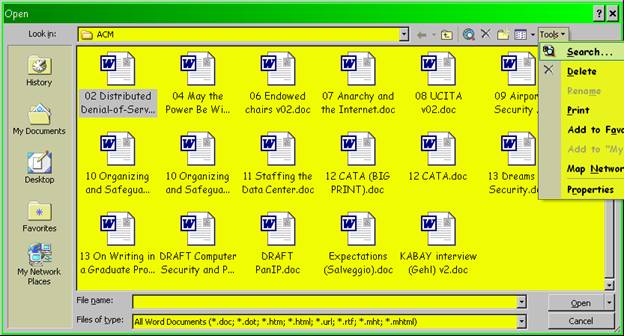
Figure 20 . Search option in MS-Office Open nenu.
You can enter key words using Boolean operators (AND, OR, NOT) and, as shown on the next page in Figure 21 , you can specify exactly where you want the system to search (or not). The other drop-down menu (not shown in detail) allows you to specify what type(s) of file are acceptable (e.g., DOC, PPT, XLS and so on).
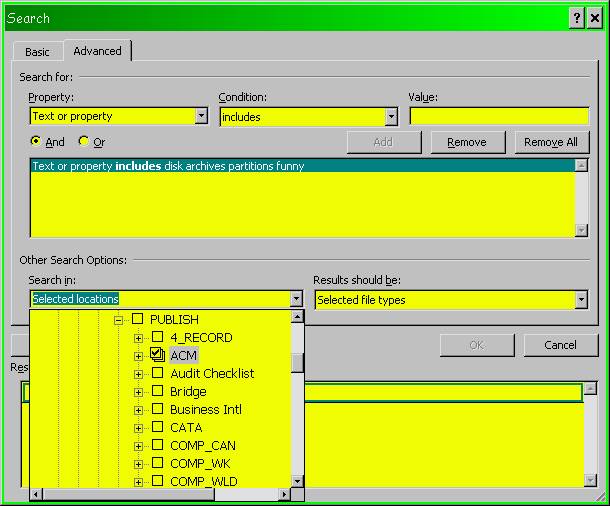
Figure 21 . Specifying a target range for search in MS-Office.
Figure 22 below shows the results of the simple search described above.
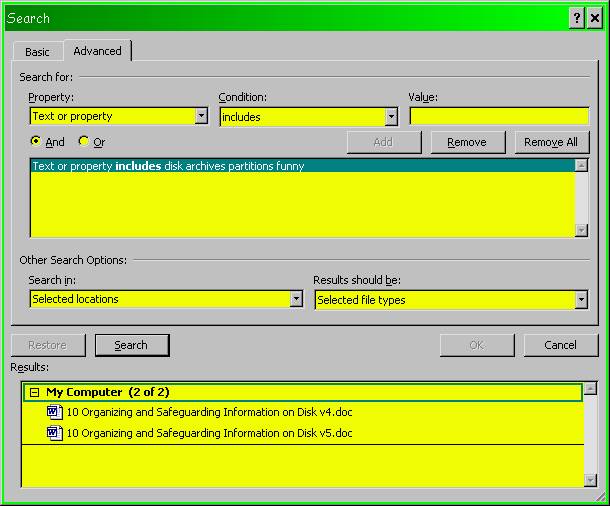
Figure 22 . MS-Office
search function results.
As you can imagine, with this degree of obsessive attention J to collecting and finding information, I also keep track of useful URLs in much the same way. Here’s the outline of my Web browser hotlist (favorites). My favorite browser happens to be Opera, but any browser today provides the ability to create organized lists of favorites. Figure 23 shows the top level folders and a view of the “Internet” subfolders.
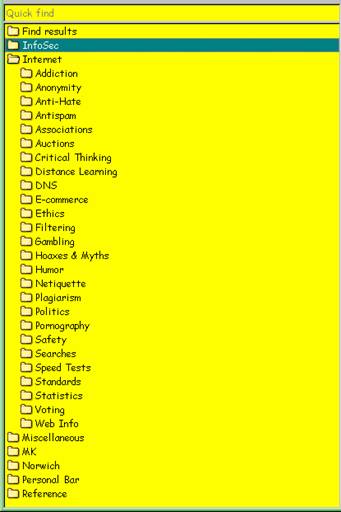
Figure 23 . Opera browser hotlist.
Each folder contains subfolders and URLs that I have collected in research on various topics. Figure 24 shows the details of a couple of subfolders in the Intellectual Property folder as an illustration.
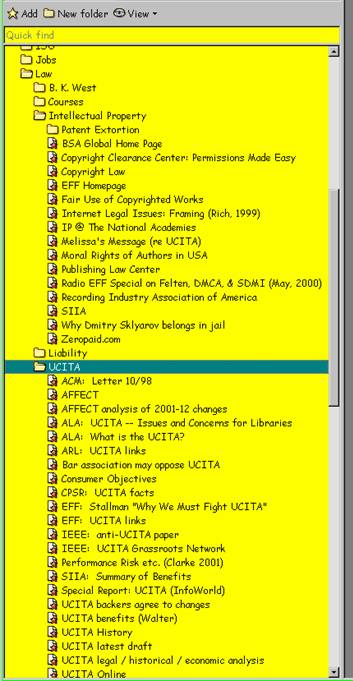
Figure 24. URLs in the Opera hotlist.
Another way of storing work is to save templates. Whenever I think I’m going to need a format again, I tend to save a template. For example, I have a bunch of files for labels, signs and cards – I don’t bother making them into real MS-Office templates because I don’t use them very often. Figure 25 shows a list of some of those files, any of which can be opened and modified easily.
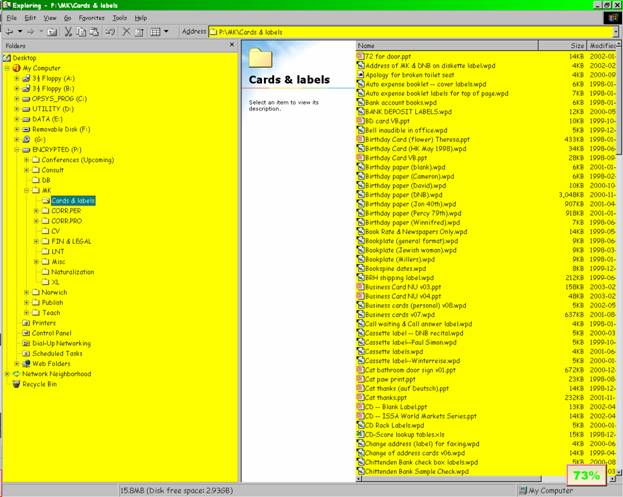
Figure 25 . Files that can be re-used.
For file formats that are frequently used, the template feature is very helpful. In Figure 26 there’s a list of the PowerPoint templates I use and a preview of one example as an illustration.
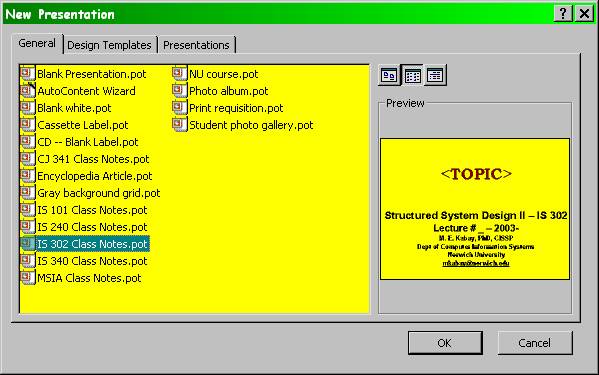
Figure 26 . PowerPoint templates.
Using such templates saves me time because I don’t have to set up the headings and footings and font preferences and so on; it ensures consistency, which is helpful for students because they can get used to the meanings I attach to specific font sizes and enhancements (e.g., normal slide text is 24 point, but a major heading is 28 point italic).
Similarly, in documents for publication, I find it helpful to have all the boilerplate in place so I don’t have to worry about it. That can include copyright information, identification, permissions and so on.
As you have gathered, I’m a neatness freak. Friends have laughed at my wife and me because we have all our spices in uniform, neatly labeled (printed!) bottles in a spice rack. Well, OK, I don’t like clutter! In contrast, I’ve seen colleagues who have dozens of icons on their screen in a helter-skelter sort of arrangement; I think that would drive me mad. Figure 27 shows a screen shot of my main computer screens (I have two screens running simultaneously using a dual-head video card set up to create a single virtual wide screen).

Figure 27 . Personalized ultra-neat desktop J .
As you can see, pretty much everything I use is on two toolbars. Programs are on the right side of the left screen so that the icons are effectively in the middle of the combined screen area and folders are across the bottom.
I try to organize my icons in some sort of logical way, but I think everybody has their own way of organizing their tools, so I don’t think it’s worth going into the details. As long as you know where things are, you can find them quickly.
As for icons, I try to make them colorful and mnemonic where I can. Figure 25 shows a closeup of some of the icons I’m using for programs (the icons have been clustered into a box for convenience in showing them on the page). I included a few explanations just to give you the idea of what I’m doing with them.
Figure 28 . Icons on the program toolbar.
Individual programs also have toolbars, and I’ve adjusted those to suit my work habits too. For example, to maximize viewing space in MS-Word most of my toolbars are on the left side, thus giving more room for the typically portrait orientation of my documents. In Powerpoint, where landscape orientation is normal, the toolbars are mostly on the top and bottom. Again, the particulars are not important; the basic principle is that by putting the most frequently-used functions on toolbars, you can save time by developing habits that help you locate the right tool quickly.
On another topic, I do tweak the color settings of the system to try to communicate meaningful information subliminally and quickly; the next figure shows some of those settings. Notice that the settings are saved with a version number so that it’s easy to go back to a previous setting if I don’t like the effects of a change.
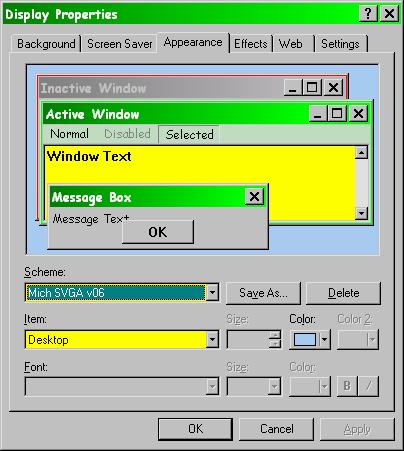
Figure 29 . Key appearance settings.
I used green for active and red/gray for inactive and adjusted the sizes to suit my (failing) eyesight. The point here is not to tell you what you ought to choose, but to suggest that you do have control over these features; if you use your computer a lot, it’s worth a few minutes of experimentation now and then to improve features to suit yourself.
Another toolkit that I think can be organized for better use is the Windows Start Menu. I don’t like the default approach, where essentially everything gets stuck into the “Programs” section of the toolbar. Figure 30 shows the organization of the Start Menu at the top level of folders.
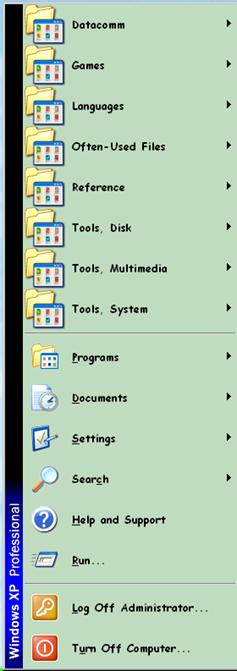
Figure 30 . Start Menu list.
Figure 31 shows what’s left in the Programs menu and Figure 32 shows a new menu and its contents. Note the colorful icons that make it easier to spot individual files quickly.
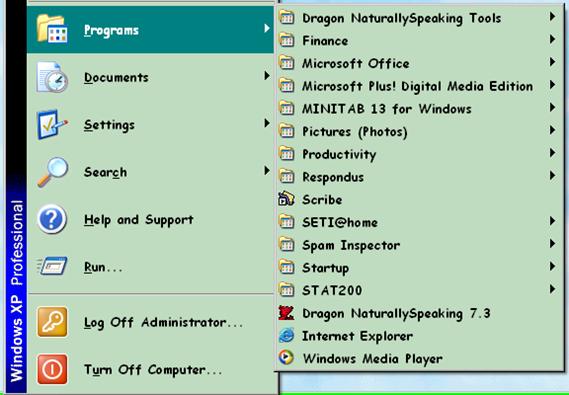
Figure 31 . Programs menu detail.
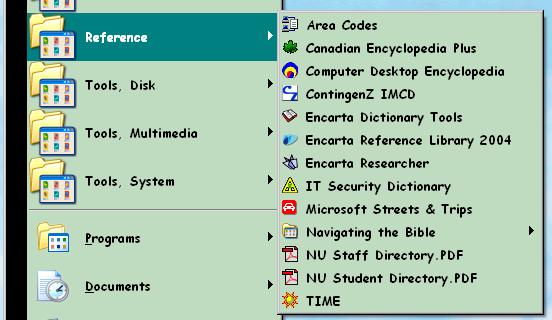
Figure 32 . Reference menu detail.
The main point of this section is that you don’t have to accept the original design of the Start Menu.
· You can create as many folders as you want to suit your needs.
· You can put pointers (“shortcuts”) into as many places as you want.
· You can rename pointers to suit yourself.
· You can adapt the icons to be easier to remember.
Another valuable tip is that you do not have to allow Windows to use variable menus where functions appear and disappear by whether you’ve used them lately or not. This has to be one of the worst user-interface ideas in the history of computing. You don’t want menus to change: you want them absolutely predictable so you can go straight to the right function without even thinking about it. In Windows, this nuisance is called “personalized menus.”
Figure 33 on the next page shows the three menus you need to navigate
(in this case, from Windows XP, but other versions are similar) to turn this
nonsense off. Right click on any blank area on the task bar and you’ll see
the first menu pop up. Click on the “Properties” entry and the next menu will
show up. Then click on the customize button and the third menu will give you
access to the choice labeled “Use Personalized Menus.” Uncheck that box.
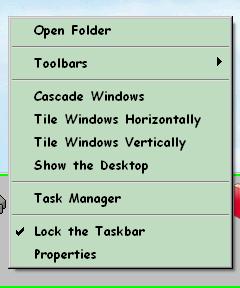
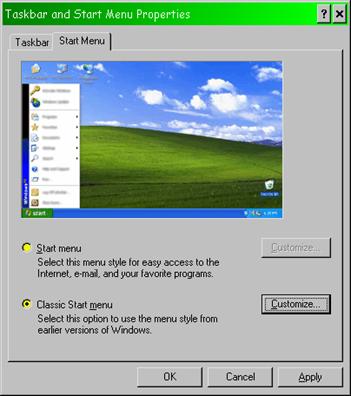
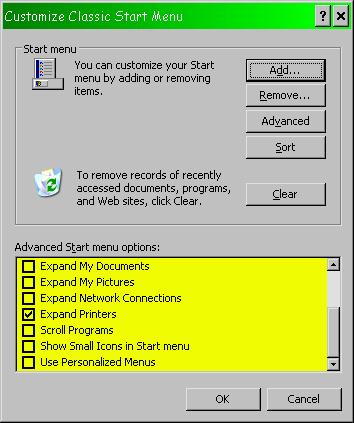
Figure 33. Preventing Personalized
Menus in Windows.
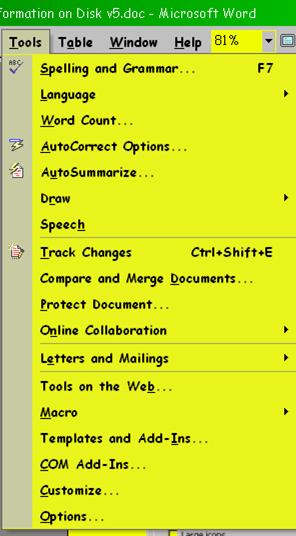
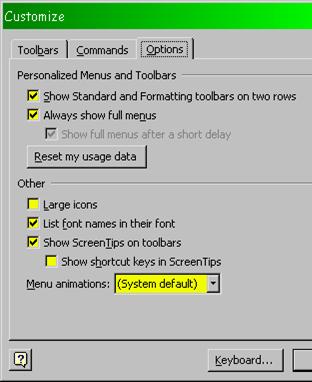
In Microsoft Office, you can turn off these pesky variable menus using the
CUSTOMIZE function under the TOOLS menu. On the OPTIONS tab, you have to check
the box labeled “Always show full menus,” as shown below in Figure 34 .
 |
|||
 |
|||
Figure 34 . Eliminating
personalized menus in MS-Office.
Well, finally, you can imagine that, with all this attention to saving information, I loathe the idea of losing work. My backup strategy has been pretty stable for years. Here it is in a nutshell:
1. Save important files with an incremented version number. Thus if yesterday’s file was important_file_v03 then today’s will be important_file_v04.
2. Set all document autosave functions to one autosave per minute. That way, in the worst case, I may have to reconstitute the last minute of work on a document.
3. Disable FAST SAVE capability in MS-Office (it’s a security risk because it stores old data inside the changed file) and force the old version of a Word document to be saved as a “Backup of” file whenever you save a new version. Figure 35 shows the Save tab for the Options menu under MS-Word.
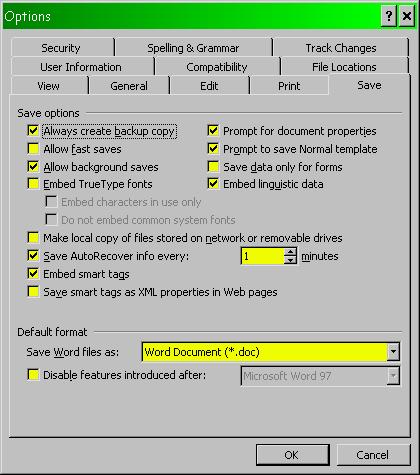
Figure 35 . Setting backup features in MS-Word.
4. Every evening when I return from my university office (where I use my portable computer) to my home office (where I use my main computer), I immediately clone my main computer data files from my portable computer’s disk using LapLink (but you can use whatever software works for you).
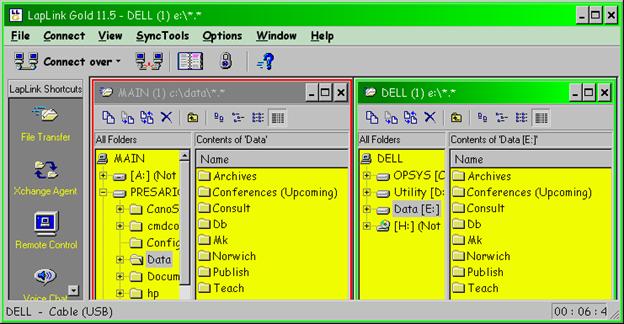
Figure 36 . LapLink interface ready for cloning.
After the cloning my main computer now has exactly the same data files as the
changed versions from the day’s work on the portable system. Effectively, I
now have a live (instant) backup of the changed files from the laptop computer.
In a pinch, I can retrieve files from the laptop if I accidentally wipe them
or damage them on the desktop system.
5. Next, I use a simple FIND procedure to locate changed files as shown below in Figure 37 . I delete any temporary and “Backup of” files.
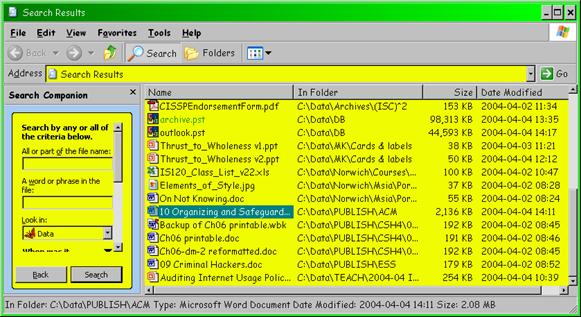
Figure 37 . Finding changed files.
6. Using WinZIP, I create a partial backup of all the files that have changed in the day’s work as shown below in Figure 38 . The archive bit allows WinZIP to ignore files that have already been backed up. I write the backup to a 2 GB Jaz disk which then gets placed in a fire-resistant safe. Recently I’ve also been using writeable DVD disks which are far cheaper ($2 for 4.7 GB instead of $130 for 2 GB).
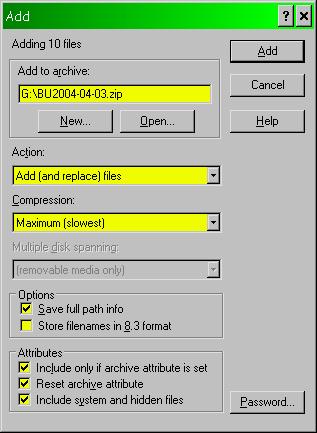
Figure 38 . WinZIP settings for daily backup.
7. Every morning, the system automatically cleans the registry and other aspects of Windows using a scheduled run of a utility (OneButton CheckUp from Norton SystemWorks) as shown in Figure 39 .
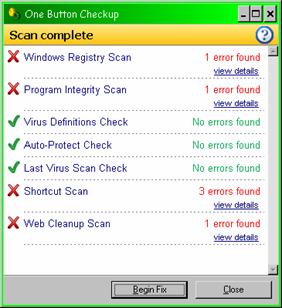
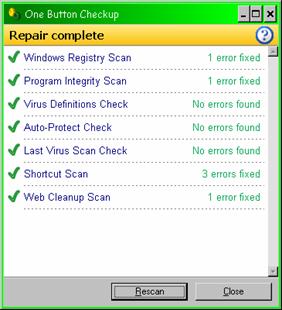
Figure 39 . Norton SystemWorks OneButton CheckUp before and after cleanups.
8. In the morning, before leaving for work at the university, I clone my main machine’s data drive back to the portable system’s drive using LapLink.
9. At the end of every month, I take a full backup of all my user data, including settings, using special DVD-backup utility (Sonic RecordNow, as shown in Figure 40 ) and store the DVDs indefinitely in the safe.
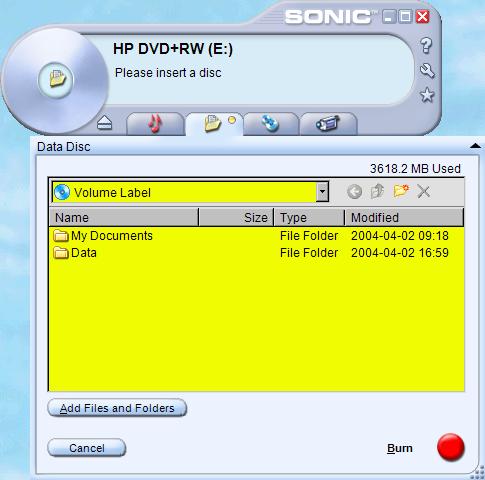
Figure 40 . Sonic
RecordNow interface for backup to DVD.
Concluding Remarks
I hope that you have found this guided tour useful. Remember, the important thing is not that you slavishly follow someone else’s recommendations – it’s that you think about how you use your tools and make rational decisions about optimizing your patterns of use.
Good luck!